Visual Studio Tips & Tricks - Part Two Conditional Breakpoints
Many people know and love the debugger in Visual Studio. Being able to set a breakpoint to stop execution at a certain line in code is invaluable. However many times you find yourself only wanting to stop when a certain condition has been meet. So often you find yourself stepping through many lines of code until you reach the desired result. The solution to this is a conditional breakpoint. VS lets you set conditions on breakpoints so they only stop when that condition is met. So let's take a look at a quick example. This is a small console app that prints numbers from 1 to 10. However we want it to stop when the loop counter is equal to 5.
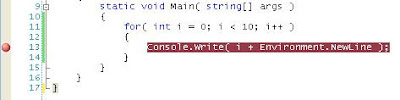
First we set a breakpoint on the Console.Write method.
So now we have a standard breakpoint set. Now to make it conditional right click on the breakpoint which brings up a context menu.
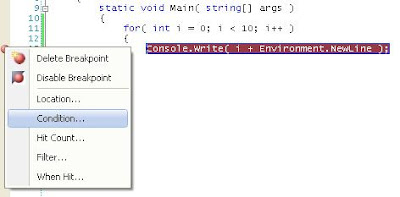
Select the Condition menu item to bring up the Condition dialog box where we can set our condition. VS is pretty smart and in 2008 (not sure about 2005) you can use intellisense on variables. Notice you can select Is true or Has changed. Select is true for cases like we're doing here. We want to check if the variable is the value we want it to be. Has changed lets you check if the value has changed.
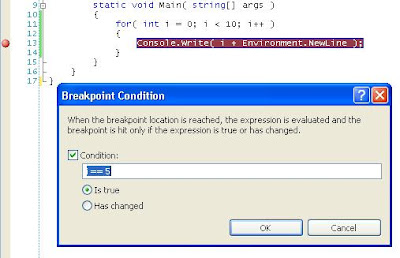
Now Click OK when you're done and you will see your new conditional breakpoint. You can tell it's conditional because of the white plus sign in the middle of the red.

That's all there is to it to create conditional breakpoints. I use them all the time and you can really get creative when you set those conditional values. I have put many statements in there with ANDS, ORS, etc. Hopefully you will find them useful as well.
First we set a breakpoint on the Console.Write method.

So now we have a standard breakpoint set. Now to make it conditional right click on the breakpoint which brings up a context menu.

Select the Condition menu item to bring up the Condition dialog box where we can set our condition. VS is pretty smart and in 2008 (not sure about 2005) you can use intellisense on variables. Notice you can select Is true or Has changed. Select is true for cases like we're doing here. We want to check if the variable is the value we want it to be. Has changed lets you check if the value has changed.

Now Click OK when you're done and you will see your new conditional breakpoint. You can tell it's conditional because of the white plus sign in the middle of the red.

That's all there is to it to create conditional breakpoints. I use them all the time and you can really get creative when you set those conditional values. I have put many statements in there with ANDS, ORS, etc. Hopefully you will find them useful as well.

Comments